
India has the largest freelance workforce after the US working independently in various sectors such as IT and programming, finance, sales and marketing, designing, animation, videography, content and academic writing.
According to a report by Noble House, Indian corporate houses are more amenable to hiring gig workers at a massive 85% compared to MNCs who are currently employing only 15% of the total assignments on offer in the last year.
Most Indian freelancers earn an average of Rs 20 lakh per annum says Money Control in a recent article.
The gig economy is booming in India. More and more people are opting for gig work instead of a 9 to 5 job. The gig workers have their own pros and cons.
They have benefits such as working at the comfort of their home, independence to choose their work hours, days and organization. At the same time, there are disadvantages like instability or no security in a job, uncertain payment schedules, and inconsistent workload.
Collecting payment from the client can be a task for freelancers. That’s why a payment gateway should be used to get your payments on time. Choosing a payment gateway can be a little confusing if you haven’t used it before.
Below is the checklist for choosing the best payment gateway in India:
- Digital Security: With lots of online security theft, it is necessary to ensure that you are carrying out transactions in a safe environment. You can check if the payment gateway is PCI DSS compliant or not.
- Transaction fees: Look for the pricing of all the payment gateways. Compare their transaction fees. Also, look if they are charging for integration fees, annual maintenance fees and setup fees.
- Multiple payment modes: Check if your payment gateway offers your preferred payment method. Make sure it has multiple payment modes like Debit/Credit Card, Net Banking, UPI, and Mobile Wallets.
- Settlement Time: Do check the processing time taken by the payment gateway. The settlement time differs from company to company. The ideal settlement time is T+3 days.
- Transaction Limit: Every payment gateway company has a different initial transaction limit. If it is less than the amount that you accept from your client, request the payment gateway company to increase the transaction limit.
How PayKun can help freelancers/gig workers to collect online payments:
PayKun Payment links help you to collect a payment within one click. It is easy to create and share payment links. It provides multiple payment modes for online payment.
How to create a payment link?
First of all, you will need to create your merchant account on PayKun. Once you have created your account, you will be given access to the dashboard.
You will find the Payment link tab. Click on “Create Payment Links”

On the right-hand side, you will see the option “Create Payment Link”
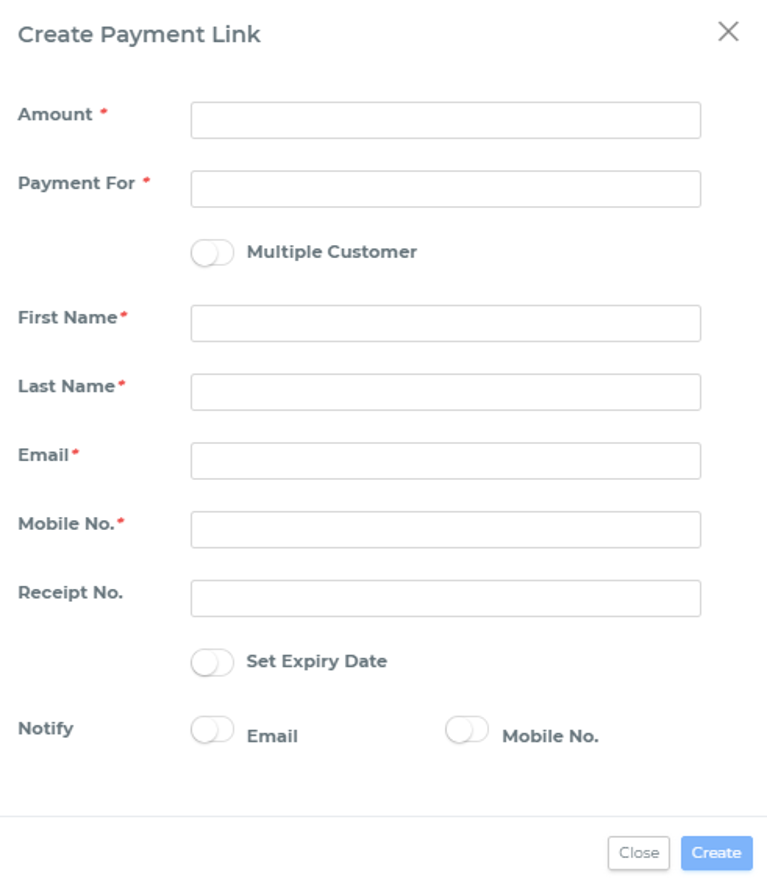
Enter the amount of the product. Fill all the details of the customer. If you wish to send the link to more than one customer, enable multiple customers. Similarly, you can set the expiry date and notify your customers via email and mobile number.
After you have entered all the details, click on Create. You will see a link created in the payment link list.
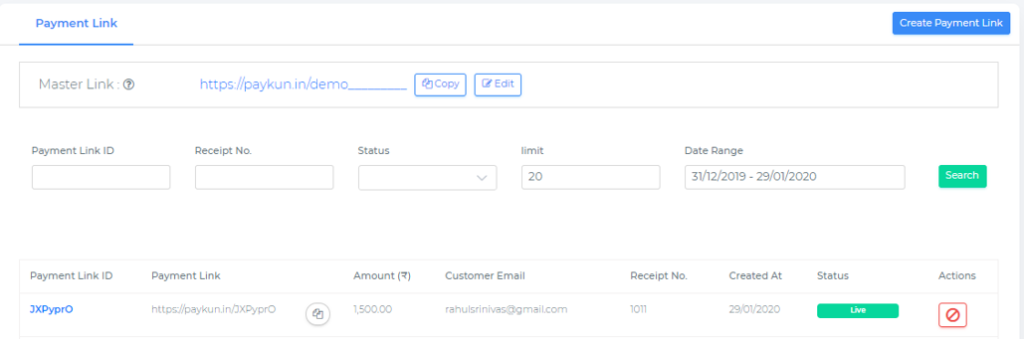
In case you do not want to create so many payment links, you can simply use Master Payment Links. Master payment links allow the client or customer to enter the amount.
To create Master Payment Links, click on the edit option

Enter the name you want for the link and save it.


Your Master Payment Link is ready! You can share this link via SMS, WhatsApp, Social Media platforms and email.
Once your customer clicks the link, they will have to enter the Amount and Purpose.

Once they enter it, the client or customer will be asked to enter their Contact Details and Payment Method.